Hi, my name is Pim van de Vis and this will be my first blog here. In this first blog I will describe how to start testing the new Workspace ONE ‘ManagedVM’ feature, which is currently in beta. (I did publish this blog before on https://brookspeppin.com but the EUCSE blog will be my new home for blogposts)
Those people that have been in the VMware EUC space for a couple years might still remember a product called ‘Horizon FLEX’. This was based on the technology from Mirage. With the Horizon FLEX package, administrators could create restricted virtual machines (Horizon FLEX virtual machines) and deploy those on laptops running VMware Fusion, Workstation or Player.
This product has been End of Life for a couple years now, but I still have customers that have valid use cases for this solution.
The main use case I typically hear is external contractors that need secure access to corporate resources like email and apps, but already have a perfectly good laptop. Basically, a BYOD. It’s very expensive to provide laptops for all temporary personal, and they don’t like walking around with 2 laptops. Why not provide these external contractors with a secure VM that is fully managed and can run on their BYOD laptop? And that VM can be wiped/deleted automatically when no longer needed.
Good news, VMware is currently running a beta that brings back this technology! The mayor thing that changed is that the Mirage Policy server that would manage the VM’s has been replaced with Workspace ONE UEM.
I have installed and tested this beta software and will describe the product in this blogpost.
To get started you need these components:
- A Workspace ONE UEM tenant v1909 or later.
- A laptop running Windows 10 with VMware Workstation Pro v16.1.0
- OR a MacBook running macOS X 10.15.7 or later with VMware Fusion v12.1.0
Once you have these components ready, you can start.
From the beta portal you can download the ‘VMware Workspace ONE Provisioning ManagedVM app’. This application comes as an MSI and will perform the creation, packaging and deployment of the managed virtual Windows 10 machines for your users. These Windows 10 VMs will be running on Windows or macOS devices. Management of these VMs is done using Workspace ONE UEM.
There are three main phases to get this started.
- Author (create) the VM
- Deploy (copy) the VM
- Provision the VM
Most time goes in the preparation stage where you author/create the VM you want to deploy. Let’s look at this phase first:
Authoring and Packaging a Managed VM
We need to start with creating the VM we want to deploy. This process involves several VMware products that work together for authoring and packaging. For the readability of this blog, I’ve broken down this phase into four steps:
Step 1: Use Workspace ONE Drop Ship Provisioning
First we need to create a provisioning package (PPKG) and unattend.xml using the Workspace ONE Drop Ship Provisioning (Offline)product.
The unattend.xml contains the automation steps that need to be taken when the VM boots up the first time: creating a local admin user, enrolling into WS1 UEM, etc.
The PPKG file contains the applications you would like to pre-load on the VM. This has a couple advantages: the enrollment goes a lot faster, since large apps are already available locally and don’t need to be downloaded. This also saves a lot of bandwidth and data usage. The VM can be up and running in a matter of minutes.
When creating the PPKG, make sure to include the Workspace ONE Provisioning ManagedVM app to the provisioning package. And it is a good idea to also include the VMware Tools.
If you do not add the Workspace ONE Provisioning ManagedVM app to the provisioning package, you can also choose to deploy it with Workspace ONE UEM to the VM once it’s enrolled to the end-user.
The installation command to add this application to WS1 UEM is very straightforward:
msiexec /i “WorkspaceOneProvisioningManagedVM.msi” /qn TYPE=Guest

Details on how the dropship provisioning works and how to create the PPKG and Unattend.xml are described in very good detail in this TechZone article:
https://techzone.vmware.com/factory-provisioning-vmware-workspace-one-operational-tutorial
Step 2: Prepare a Windows 10 virtual machine (VM)
To continue the process, we need to create a virtual machine using VMware Workstation Pro or VMware Fusion. In this blog I will use Workstation Pro, but the steps for Fusion are similar.
First make sure to install VMware Workstation Pro.
Next, install the ‘WorkspaceOneProvisioningManagedVM.msi’ in ‘Packager’ mode with this installation command:
msiexec /i WorkspaceOneProvisioningManagedVM.msi /qn TYPE=Packager’
Packager mode installations are used by admins who prepare Windows 10 VM images and who package them into managed VM package files.
Now it’s time to create a new virtual machine.
Below is a list of requirements for this virtual machine:
- Make sure the virtual machine has no snapshots
- Do not encrypt the VM
- Make sure the ‘Folder sharing’ option is disabled:

- Disable ‘Guest isolation’:

- Enable ‘VBS’, select ‘UEFI’ firmware and enable ‘secure boot’:

For more information, here is a documentation link on how to prepare a Windows 10 virtual machine (VM) for Windows Desktop using VMware Workstation Pro Documentation.
And if you are using VMware Fusion on a MacBook: Prepare a Windows 10 virtual machine (VM) for macOS using VMware Fusion Documentation.
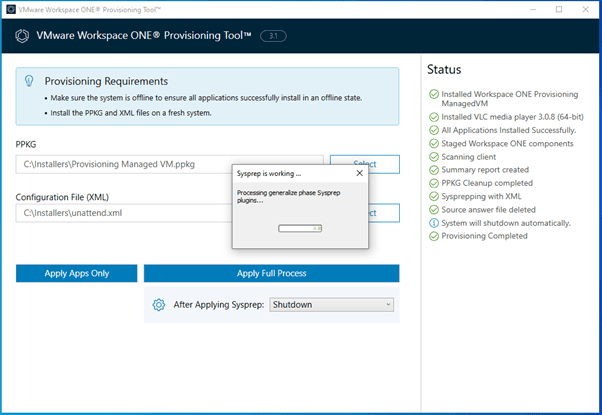
Step 3: Workspace ONE Provisioning Tool
Now you can install Windows 10 on this virtual machine, boot into Audit Mode and run the VMware Workspace ONE Provisioning Tool to apply the PPKG and unattend.xml. This will use Sysprep to prepare the VM for distribution.
These steps are described in details here:
https://techzone.vmware.com/factory-provisioning-vmware-workspace-one-operational-tutorial#_1024617
Make sure to choose the option to ‘shutdown’ after the machine has run Sysprep:
Step 4: Package the VM
The final step in preparing the VM is to package the VM into a ZIP file that can be distrusted to end users. This will be done with the Workspace ONE Provisioning ManagedVM app that we installed in step2.
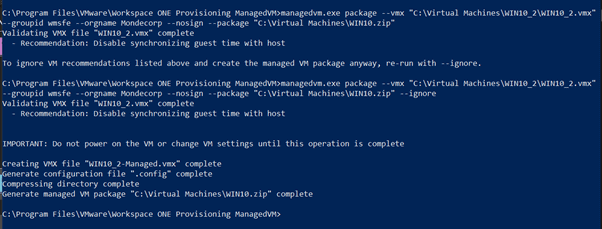
These are the command options to create a single ZIP file that contains the VM we created:
managedvm package –vmx <path> –groupid <id> –orgname <name> –cert <cert> –pfx <path> –selfsigned –nosign –timestamp <url> –nolock –notpm –norepair –grace <days> –package <path> –overwrite –ignore
The screenshot below shows the command I ran for my tests. As you can see you will get feedback and best practices. I got a warning to ‘disable synchronizing guest time with host’. I chose to ignore this with the –ignore switch.
I also chose to use the –nosign option, since this is a test environment. This switch will create an unprotected managed VM package without a digital signature. Specifying a certificate with –cert or –pfx is not required when –nosign is set, so do not use this action in production.
Deploying and Provisioning a Managed VM
Now that you have a packaged VM, you can deploy it on the (BYOD) host device. This can be done with any existing tools. Make sure you consider that the VM ZIP file can be large (multiple GB). For my test I used a USB key, but you could also use a file share, or a cloud-based file transfer system, etc.
You need to use the Workspace ONE Provisioning ManagedVM application to provision your managed Windows 10 VM on the host device.
Before installing the ManagedVM app, you must meet these requirements.
- If you are provisioning to Windows 10 devices, use VMware Workstation Pro v16.1.0.
- If you are provisioning to macOS 10.15.7 or later devices, use VMware Fusion v12.1.0.
First, we need to install the ManagedVM app in ‘Host’ mode with the following command:
msiexec /i WorkspaceOneProvisioningManagedVM.msi /qn TYPE=Host
Next you need to extract (provision) the VM. These security measures will be taken to prevent users from tampering with the VM:
- A vTPM will be added and VM will be encrypted
- VM will be locked, users cannot make changes to virtual hardware.
To provision the VM, run the following command on the host device:
managedvm provision –package Win10MondecorpSigned.zip –notifyuser
In my test environment I’ve added to –noverify switch, because my VM is not signed, see the screenshot below:

Because I’ve also added the –notifyuser switch I got this nice native Windows notification when Provisioning was complete. The user can now start the VM. During first boot the VM will go to OOBE and guide the user through the auto enrollment process to register the VM in WS1 UEM.

For my tests I’ve created a simple batch file that installs the ManagedVM app MSI and does the provisioning of the VM, making it as simple as a double-click for the end user to get started.
That’s it, the user can start working on his VM!
Final thoughts
After a while typically the VM would need to be decommissioned. There is already a Grace period in which the user needs to enroll the VM after provisioning. And you can send a wipe command from WS1 UEM, effectively rendering the VM useless after it’s no longer needed.
Or you can manually remove the VM. This Deprovision process is possible with the following command:

In the future this Provisioning and Deprovisioning process will offer more automations, so that you can have more control.
If you go to the VMware EUC beta portal https://beta-ea.vmware.com/ and search for “WS1 ManagedVM” you can join this beta.
Please give this a try and leave your feedback.