
In this blog post, we’ll look to create an environment where we use Okta to provision user accounts into Azure and Workspace ONE so that we can perform Azure out of the box enrolments into Workspace ONE without the need for any on-premise components like connectors or Active Directory.
I’ve designed this post to be a step by step guide starting from no configuration, to a fully working instance. I’ve taken some bits from official documentation along with screen shots, added my own sections and added my own screen shots. This process can take a while, but once you’ve got the elements in place you’ll get a very easy to manage environment that provides a very nice end user experience to your employees. If you think that there are any elements missing from this workflow, let me know in the comments.
For this we will need access to the following:
- Access to an Okta Instance with admin rights
- Access to Azure as an administrator – Azure Premium
- Access to Workspace ONE Access and UEM as an administrator
An aspect that we need to make sure we get right:
- ImutableID in Azure needs to be the same as “Azure Active Directory Mapping Attribute” in Workspace ONE UEM
Ok, now we have access to the relevant components where do we start? The order that we’re going to run through this is as follows.
Process:
- Create a domain in Workspace ONE Access using Postman that Okta will provision users into.
- Setup Workspace ONE App in Okta to provision users into Workspace ONE Access.
- Setup Okta as a third party idp into Workspace ONE Access.
- Configure SAML authentication from Workspace ONE UEM into Workspace ONE Access.
- Configure the AirWatch Provisioning app in Workspace ONE Access to push users from Access into Workspace ONE UEM.
- Confirm that the attributes match across all solutions.
- Configure Office 365 app in Okta to provision users and federate to Okta.
- Configure Azure MDM application to point to Workspace ONE UEM.
1 – Creating a domain in Workspace ONE Access
In order to create a new domain in Access for Okta to provision the users, we need to use postman: https://www.postman.com/
Create Remote App Access Client
Process:
- Log into the Workspace ONE Access console.
- Click the arrow on the Catalog tab and select Settings.
- Click Remote App Access in the left pane.
- Click Create Client.
- For Access Type, select Service Client Token.
- For Client ID, enter an ID, for example, OktaSCIM.
- Expand the Advanced section.
- Click Generate Shared Secret.
- Update the Access Token Time-to-Live setting to a longer time than the default.

- Copy the shared secret. You will need this later in the setup process.
- Click Add.
Generate OAuth Bearer Token
After creating the Remote App Access client, generate an OAuth bearer token.
Prerequisites
Download and install the Postman app. You can download Postman from https://getpostman.com.
Procedure
- Open a new tab in the Postman app.
- For the HTTP method, select POST.
- For the URL, enter: https://tenanturl/SAAS/jersey/manager/api/connectormanagement/directoryconfigs
Replace tenanturl with your Workspace ONE Access URL, for example:https://example.vmwareidentity.com/SAAS/jersey/manager/api/connectormanagement/directoryconfigs - Click the Authorization tab and select OAuth 2.0 as the type.

- Click Get New Access Token.
- For Token Name, enter a name, such as Workspace ONE.
- For Grant Type, select Client Credentials.
- For Access Token URL, enter https://tenantURL/SAAS/auth/oauthtoken, where tenantURL is your Workspace ONE Access tenant URL.
For example: https://example.vmwareidentity.com/SAAS/auth/oauthtoken - For Client ID, enter the Client ID that you set in previously.
- For Client Secret, enter the secret that you set previously.
- For Scope, enter admin.

- Click Request Token.
A token is generated and displayed. - To verify that the bearer token was added, click the Headers tab and click hidden headers.

- The bearer token appears.

- If the bearer token was not added, return to the Authorization tab and select your token from the available tokens drop-down list and check again.
Create a Directory of Type of other in Workspace ONE Access
Procedure
- Under Headers, set the Content-Type to:
application/vnd.vmware.horizon.manager.connector.management.directory.other+json

- Click the Body tab.
- Use the following as a sample and click Send.
{
“type”:”OTHER_DIRECTORY”,
“domains”:[“OKTA.COM”],
“name”:”Okta Universal Directory”
}
Note:Make sure that your domain is unique within your tenant.
You should see a result similar to the following:

2 – Configure the VMware Workspace ONE Access Application in Okta
In the Okta Admin console, add the VMware Workspace ONE application from the Okta catalog, then configure the application.
Procedure
- Log into the Okta Admin console.
- Click Applications > Applications.
- Click Add Application.
- Search for the VMware Workspace ONE application.
- Select VMware Workspace ONE under Integrations.

- Click Add.

- In the Base URL text box, enter your Workspace ONE Access URL.
For example: https://example.vmwareidentity.com - Make sure there’s no ‘/’ on the end of your URL, it’ll give you an error!

- Click Done.
- Click the Provisioning tab and click Configure API Integration.

- Select the Enable API Integration check box.
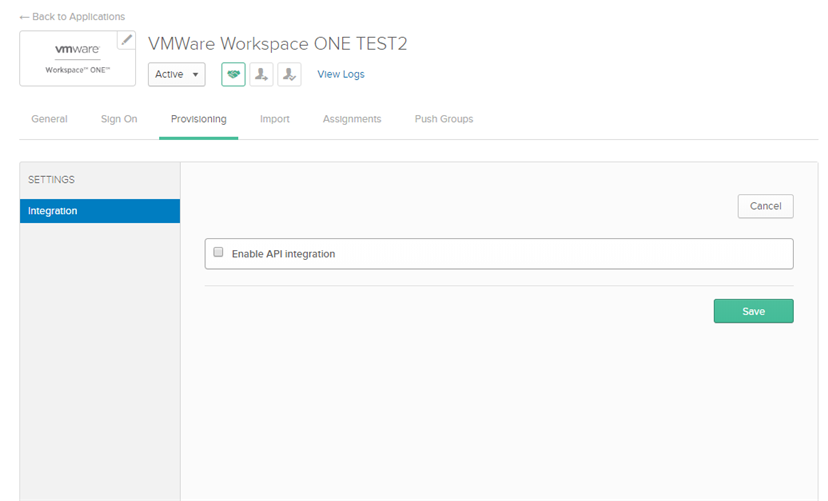
- In the API Token text box, paste the bearer token that you created with Postman.

- Click Test API Credentials and ensure that you see a successful message before proceeding.

- Click Save.
- Click the Edit button.

- Select the Enable check boxes for Create Users, Update User Attributes, and Deactivate Users, then click Save.

- Scroll down and edit the domain attribute.

- Edit the domain so that it matches the domain you used when you created the directory in Workspace ONE Access.
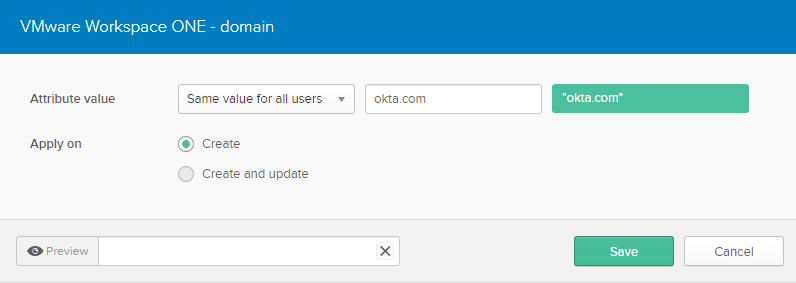
- Click Save.
SCIM provisioning set up is complete.
Go to the Assignments tab in the VMware Workspace ONE application and assign the application to users or groups. When you assign the application to a user, the user is created in Workspace ONE Access. When you remove the application for a user, the user is disabled in Workspace ONE Access.
You can go to the Push groups tab in the VMware Workspace ONE application to push groups to Workspace ONE. When you push a group, the group is created in Workspace ONE Access and the group membership is pushed. Members of the group must already be assigned the Workspace ONE Access application.
3 – Add Okta as a third party idp in Workspace ONE Access

- Navigate to your applications in Okta.
- Select Vmware Workspace ONE.

- Click the ‘Sign on’ tab
- Scroll down and select ‘View Setup Instructions’, this will provide a perfect walkthrough on how to add Okta as the 3rd party idp in Workspace ONE Access.
- After completion, if you have an issues when logging into Workspace ONE Access, I may be your usernames. In Okta change the credentials details to the below:

substringBefore(
user.login, '@')
Now that we can login to Workspace ONE Access using Okta as the 3rd party idp, we need to provision the user over to Workspace ONE UEM. We do this by using the ‘AirWatch provisoning’ app in Access.
Before completing this, you’ll need an Admin account and the Workspace ONE UEM API key.
4 – Configure SAML Authentication from Workspace ONE UEM into Workspace ONE Access
This is a really straight forward step that shouldn’t take much time at all (famous last words).
- In your Workspace ONE Access Portal, navigate to ‘Catalog’ and Web Apps

- Click on ‘Settings’ on the right

- Then select SAML Meta data:

- Right click on ‘Identity Provider metadata’ and save – you should be able to save this as ‘idp.xml’
- Navigate over to your Workspace ONE UEM console, Groups&Settings->System->Enterprise Integration->Directory Services
- Upload the save idp.xml file to the SAML 2.0 section and scroll to the bottom and hit save. This will populate the fields from the XML file
- Make sure that the Authentication Response Security field is correct:

- Scroll up and enable SAML for Enrollment
- Now you’ll need to add a ‘AirWatch’ application into Workspace ONE Access that matches these settings:
- In your Access console, navigate to Catalog->Web Apps
- Select New and search for ‘AirWatch’

Under configuration fill in the following information:
- Device Server URL
- GroupID
- And audience (default is AirWatch)

- The last step is to assign the application to users and save.
- You can test the SAML integration by clicking the newly created app in the user portal or navigating to the following Url’s
- Or you can test the SAML authentication by navigating to: https://<hostname1>/enroll?GID=<AWgroupId>
- Eg My environment is https://ds135.awmdm.com/enroll?GID=CHProd
5 – Configure the AirWatch Provisioning App
Add AirWatch Provisioning App to the Catalog
You add the AirWatch Provisioning app to the catalog in the Workspace ONE Access console and assign users to the app. When users are assigned to the app, they are provisioned in Workspace ONE UEM and can access the service.
Prerequisites
Make sure that SAML authentication is enabled in the Workspace ONE UEM console in the Accounts > Administrators > Administrator Settings > Directory Services section.
An identity provider must be configured as the SAML provider before you configure the AirWatch Provisioning app. If you want to useWorkspace ONE Access as the SAML provider, follow the instructions in the Configuring Single Sign-on from the VMware Identity Manager Service to AirWatch Applications guide.
Procedure
- Log in to the Workspace ONE Access console.
- Select the Catalog > Web Apps tab.

- Click New. The New SaaS Application wizard appears.
- Enter AirWatch Provisioning in the Search text box or click or browse from catalog, and select AirWatch Provisioning from the results.
- To proceed, click Next.
- On the Single Sign-On page, configure settings as required by your organization. Some settings are populated with default values relevant to the AirWatch Provisioning app. To learn more about a setting, click the information icon next to the setting.
Note:For any setting not listed in the following table, accept the default value.

- Click Next. Keep the default_access_policy_set.
- Click Save. The app is added to the catalog. Now you can enable provisioning.
- Select the AirWatch Provisioning app from the catalog list and click Edit > Configuration.
- Click Advanced Properties and scroll to Setup Provisioning.
- Click the radio button to change No to Yes.

- Select Provisioning and enter the following information.
- AirWatch host. URL of your Workspace ONE UEM REST API (usually as xxx.awmdm.com)
- Admin user name
- Admin password
Note:Provide a Workspace ONE UEM admin account where the role is configured as Console administrator.
Important: By default, the password of this administrator is changed every 30 days from the Workspace ONE UEM console. Make sure that you update the password in the AirWatch Provisioning app settings. - AirWatch API Key.
Note:If you do not have an API key, in the UEM console, go to Groups & Settings > All Settings > System > Advanced > API > REST API. Click Override and select Add. Provide a service name and the account type of Admin. Copy the API key to enter on this page. - AirWatch Group ID. Enter your top-level OG group ID.

- Click Test Connection to validate connectivity. Click Next.
- In the User Provisioning page, verify that the attributes with which to provision users in Workspace ONE UEM are listed. Attribute names with an asterisk are required for provisioning. Click Next.

- In the Group Provisioning page, add the groups that you want to provision in Workspace ONE UEM. These user groups are automatically created in Workspace ONE UEM.

- Click Next and on the Summary page, click Save.
- Confirm the attribute match across all Solutions
6 – Confirm Attributes
Okta provisions users into Workspace ONE Access with the Okta Unique Identifier. This attribute SHOULD automatically match with the users ExternalID field in Access. We also provisioned the user into Workspace ONE UEM so that the AAD mapping attribute is the same as the ExternalID.

Checking the user in Workspace ONE UEM:
- Navigate to your users and select the testing user that’s been generated from Workspace ONE Access and hit edit in the top right

- This will bring up all the users details and show the AAD Mapping Attribute:

- Make sure the attribute matches the ExternalID in Access
7 – Configure Office 365 app in Okta
- In Okta navigate to your applications and select ‘Add Application’, select ‘Microsoft Office 365’

- As you run through the configuration, the main aspect I want touch on here is to set the ImmutableID the same as Workspace ONE. This can be done by changing the user mapping:

Select ‘Okta User to Microsoft Office 365’ and in the immutableID mapping paste: user.getInternalProperty(“id”)
The caveat here is that I’ve done this in a testing environment, I have no idea what would happen if you’ve already got Office configured with a different immutableid mapping. Proceed at your own risk!
Lets pause for a minute and review what we’ve done:

Create a domain in Workspace ONE Access– DONESetup Workspace ONE App in Okta– DONESetup Okta as a third party idp into Workspace ONE Access– DONEConfigure SAML authentication from Workspace ONE UEM into Workspace ONE Access– DONEConfigure AirWatch Provisioning app in Workspace ONE Access– DONEConfirm that the attributes match across all solutions– DONEConfigure Office 365 app in Okta– DONE- Configure Azure MDM application to point to Workspace ONE UEM – To Do
8 – Setup MDM app in Azure
- In your Workspace ONE UEM console navigate to Groups&Settings->System->Enterprise Integration->Directory Services
- Scroll down and Enable Azure AD Integration

- This will provide you with your discovery and Terms URLs

- Now in Azure navigate to Mobility (MDM and MAM)

- Select ‘Add Application’ and pick AirWatch by VMware

- Now insert your details from the Workspace ONE UEM console:

- Make sure that this app isn’t assigned to anyone.
- Now add another application and select ‘On-premise MDM Application’


- Insert the same details as the previous app and assign it to the users that you want to enroll into Workspace ONE UEM and save

- Now navigate to the properties section of you Azure portal and copy the Tenant ID

- Flip back to your Workspace ONE UEM console and insert the tenant ID along with your Azure name:

- Make sure the Immutable ID Mapping Attribute is set to ‘String’ and hit save.
Nailed it!
TEST!
All the pieces should now be in place to perform Windows 10 Out of the box enrolments into Workspace ONE using Okta as the source of authentication! I hope you’ve found this useful!
Official Documentation:
- Domain creation in Workspace ONE for Okta provisioning
- Workspace ONE App in Okta
- Okta as 3rd party idp in Workspace ONE Access
- Provisioning users into Workspace ONE UEM from Access
- Office 365 setup in Okta
- Azure MDM app

Sales Engineer specialising in Unified Endpoint Management (UEM) and Identity Management.
Technical Expertise:
o Okta – Identity Management – Providing single sign on services to applications
o VMware Workspace ONE – Configuring and managing AirWatch components across all device types.
o Digital Transformation – Helping organisations implement and deploy a modern strategy for UEM
o Networking – VPN, DNS, DHCP
o Device Management – macOS, iOS, Android, Windows and Rugged Devices
o Cloud Solutions – Azure, Office 365, Identity Providers, VMware AirWatch
o Server – Windows Server, Active Directory, Exchange
September 28, 2020 Weekly Digest for End User Computing | For servers
October 8, 2020[…] Windows 10 Azure Enrolment with Okta Directory & Workspace ONE […]
kavyagologica
February 23, 2021Looking forward to getting more updates and we play a small role in upskilling people providing the latest tech courses. Join us to upgrade on OKTA ONLINE TRAINING
kavyagologica
March 1, 2021Great read! Thank you for such useful insights. Visit here for advanced technical courses on OKTA ONLINE TRAINING
Lalitha
February 16, 2022This was really useful for me for setting up a proof of concept and I appreciated the details. One thing I will add is , as of 2022 in UEM you need to do another step 5. You need to go to Groups and Settings — all settings — Devices and Users — General — Enrolment. In the authentication tab, need to select Authentication Modes as Directory. If we don’t do this, then provisioning fails in the Airwatch provisioning app. Hope this helps someone!